Smoke color use shop flame
pyro>utils>parm transfers>locate ur smoke obj >apple this transfer
Thursday, 4 February 2016
Thursday, 21 January 2016
Week 14 - Look Development - Creating Smoke for Fractured Tiles
New stuffs learnt from this lesson:
To view smoke through smoke's dopnet:
smoke dopnet properties>data :density
To delete the geometry:
every geometry has default - inside & outside group
To make the gas fade over time:
inside the smoke solver, (input 4: advection) gas dissipate node : diffuse and evaporate
Make smoke stop emitting after a certain frame:
source volume's scale source volume for smoke scale.
source volume's expression:
if($F<10,3,0.1)
so that smoke wont emit after 10 frames
To render smoke in render view:
Use Dop I/O node
you can either choose presets: smoke OR
under fields to import : 1 , field : density
Tuesday, 19 January 2016
Week 14 - Procedural Effects - Introduction to Smoke
We are able to create smoke using their preset functions.


Use sphere node (primitive type is fine) and add a fluid source node, under scale volumes>noise> tick 'use noise' to make the smoke flickering animation.
add a dopnet - to calculate smoke

inside the dopnet, add the following, smoke object node: under the properties, division size increases the resolution of the smoke.(The lower the higher res), and intial data>closed boundaries means the smoke will collide with the box size (spreading out inside the box)

notes: middle mouse on the little arrow to show the input name.(image above)
Add Gas Resize Fluid Dynamics to make the box of the smoke fits the smoke everytime.
Add Gas Turbulence to control the random direction of the smoke
Add Source Volume and link the smoke source object. etc /obj/THE_SMOKE_SOURCE/OUT_SMOKE_SOURCE
Add Wind Force to modify the smoke direction. X,Y,Z
Use Lights for color of the smoke.
To render the smoke,
Add new geometry node and add Dop I/O
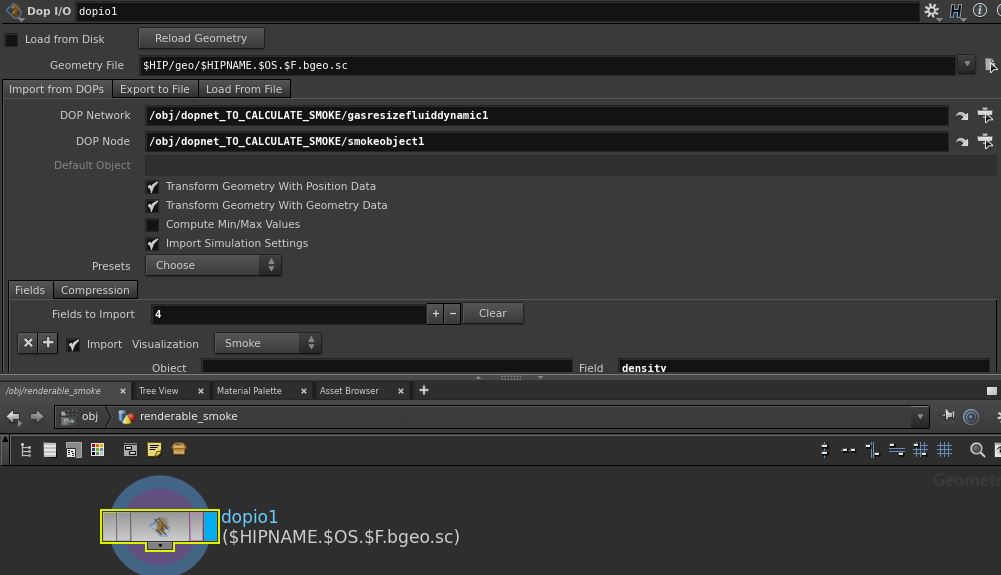
Change DOP Network : /obj/dopnet_TO_CALCULATE_SMOKE (IMAGE IS MY FILE)
Change DOP Node : /obj/dopnet_TO_CALCULATE_SMOKE/smokeobject1
Under the Preset, choose Smoke. DONE
Make objects collide with the smoke
Inside the dopnet, add static object and static solver , merge. make sure the static is at the left side (because merge's left input affect right inputs :Collide Relationship)
In the Static object, tick use deforming geometry, tick use object transform, tick display geometry.
We are done.

Friday, 18 December 2015
Week 9 - Dynamics Simulations - Coffee Stir
-open teacher's mug model
-under dynamics tab, create 2d container, place in on the mug surface.
-change fluid shape density buoyancy to Zero.
-fluid effects > add/edit cotents > paint fluid tool. settings,
-paint attributes, paintable attributes> density and color.
-attribute maps, import the coffee png.
-at the render view, change to legacy
-make a cylinder as a stir-er, select fluid, shift cylinder, make colide.
-animate the cylinder and see the results.

USE VISOR PRESET
-create clouds, create 2d container,
-the preset at the attribute editor you have a list of presets.
*notes, you can convert them to polygon! (convert fluid to polygon)

Sunday, 29 November 2015
Nuke 3D Tracking, Maya render export motion blur, nuke composite motion blur
how to export motion blur data from maya:
-image sequence
openEXR .exr
-mental ray
-Passes, create scene pass
-2d motion vector (aka mv@DToxik)
-move down / Associated Passes
Done
Import motion blur data to Nuke

change maya camera to nuke scale
create a locator in maya,
parent the locator with the maya camera,
bake the locate so that it has the transform attribute,
create a new camera,
parent the locator with the new camera
bake the new camera,
delete the locator and you can export that new camera (FBX) to nuke.
next step, import the new camera to nuke
node, new camera,
tick 'read from file'
browse the camera fbx.
DONE
-image sequence
openEXR .exr
-mental ray
-Passes, create scene pass
-2d motion vector (aka mv@DToxik)
-move down / Associated Passes
Done
Import motion blur data to Nuke

-vector blur node
-change UV channel to MV2E...
method to forward
-alpha rgba.alpha
change maya camera to nuke scale
create a locator in maya,
parent the locator with the maya camera,
bake the locate so that it has the transform attribute,
create a new camera,
parent the locator with the new camera
bake the new camera,
delete the locator and you can export that new camera (FBX) to nuke.
next step, import the new camera to nuke
node, new camera,
tick 'read from file'
browse the camera fbx.
DONE
Tuesday, 24 November 2015
Week 6 - Thor Run

final

overview

inside solver
new codes week6 thor run
-----------------------
NEW CODES:
$SIZEZ/2
$CR OR $CB OR $ CG (RED BLUE GREEN)
$VY>$VZ
-----------------------
Brief notes:
notes: selecting and grouping the shoe sole, coloring the sole to red value,
attribute transfer (source(rightside):red sole, destination:grid)
point node to adjust the position using $CR .
------------------------
Whats solver?
#using solver and file node to write animation(play smoothly) -$F3.bgeo-
------------
#add velocity color to sole
add trail node to add velocity attribute,
add point node, add color, Y = $VY>$VZ
means if the upward ($VY) velocity is greater than the forward ($VZ), then color point green.
------------
whole steps:
file bgeo thorrun, rescale,
select and group left right soles,
delete unselected, color both soles to red(use pointnode).
make grid, change color to blue(use pointnode)
attribute transfer node: grid left, sole right. attri>points>Cd
add point node with position add ramp attribute at parameterY=ramp("ramp",$CR,0)
point node to recolor everything to one color.
solver to write bgeo.
-------------
how to add particles?
Null the soles from delete node,
add trail node to add velocity attribute.
point node with Color Y = $VY>$VZ
add popnet node-old
Subscribe to:
Posts (Atom)